

Getting Started With WunderGraph: An API Gateway That Turns GraphQL Into RPC on the Fly
A comprehensive guide to WunderGraph, the API Gateway that turns GraphQL into RPC on the fly, with a focus on its TypeScript Operations.
I’ve been using WunderGraph a lot lately for my NextJS projects.
I really dig it. It lets me define all my data sources as dependencies in config — and NOT hardcoded in my app code — which it then introspects into a virtual graph that I can write GraphQL queries to get data out of. Then, WunderGraph turns these operations into simple JSON-over-RPC calls.
It’s the best end-to-end devex you can ask for, but since it can do SO much — introspection and consolidation of multiple disparate data sources, auto-generated typesafe hooks in dev, auth, etc. — it can be a little difficult to grok WunderGraph’s fundamentals.
So I wrote this to ease you into it. It’s a tutorial on how to build an app that uses WunderGraph + NextJS to fetch bands/artists who are based in a given country’s capital.
We’ll be taking a look at some critical features of WunderGraph, what they do, how to use them, how to deploy projects created with them, and some gotchas to avoid. Let’s get started!
The Setup
The best way to do this would be to walk through features as we code, so let’s do just that. First, use their CLI tool to set up a WunderGraph server + NextJS frontend.
COPY
COPY
> npx create-wundergraph-app my-project -E nextjs
Then, cd into the directory (you can name it whatever you want, not just my-project), and then install all the dependencies with this.
COPY
COPY
npm i && npm start
This will also start up the NextJS app at localhost:3000. Go visit it on your browser, and if you see a splash page with the output of an example query, you’re all set up. Time to get back to the IDE and start hacking.
1. WunderGraph 101
Here’s the meat and potatoes of working with WunderGraph.
Step 1: Define your data sources as a dependency array
In ./.wundergraph/wundergraph.config.ts you’ll find a config-as-code approach to managing data dependencies — which works out much better for readability and maintainability compared to hard-coding your data sources in code, committed to repos.
💡 WunderGraph supports OpenAPI REST & GraphQL APIs, SQL & NOSQL databases, Apollo Federations, and many more. Check out the full list here.
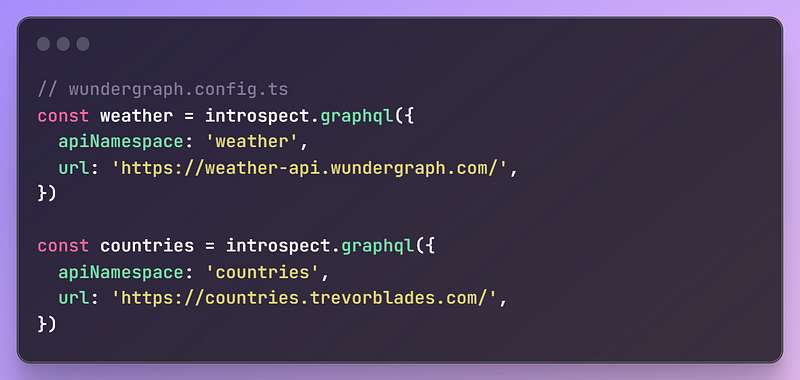
The two data sources we’ll be using are the GraphQL Countries V2 API (to return a given country’s capital) and the GraphBrainz GraphQL API (to search artists by country and fetch their data).
Add them to your wundergraph.config.ts file like so, hit save, and the WunderGraph API server will introspect these two datasources, and generate/add models and schema to the virtual graph.
COPY
COPY
const countries = introspect.graphql({
  apiNamespace: "countries",
  url: "https://countries.trevorblades.com/",
});

const graphbrainz = introspect.graphql({
  apiNamespace: "graphbrainz",
  url: "https://graphbrainz.fly.dev/",
});

// configureWunderGraph emits the configuration
configureWunderGraphApplication({
  apis: [countries, graphbrainz],
  ...
})
Data could be in databases, Apollo Federations, REST APIs with OpenAPI specs — whatever. With WunderGraph, you won’t need to create separate clients for working with each.
If you wanted to, you could also check the internal schema of this generated virtual graph at ./.wundergraph/generated/wundergraph.schema.graphql. You’ll be able to see exactly which queries, mutations, and subscriptions you can define on each datasource.
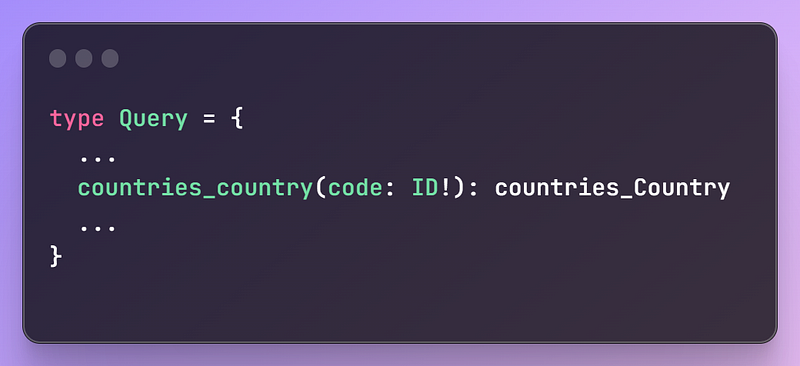
For example, you’ll see that the country query for this API requires a param called code, of the GraphQL scalar type ID.
Step 2: Write GraphQL queries for your data sources
How do you actually get data from these data sources? GraphQL queries. Armed with the information above, you can now write your GraphQL operation to pass in a country code (in ISO-3166 format), and put the two .graphql files in ./.wundergraph/operations.
Here are the two GraphQL queries we’ll need. Mind the namespacing!
CapitalByCountry.graphql
COPY
COPY
query CapitalByCountry($countryCode: ID!) {
  countries_country(code: $countryCode) {
    name
    capital
  }
}
ArtistsByArea.graphql
COPY
COPY
query ($query: String!) {
  graphbrainz_search {
    artists(query: $query, first: 10) {
      edges {
        node {
          name
          discogs {
            images {
              url
            }
            profile
          }
        }
      }
    }
  }
}
Then, when you hit save, the Wundernode will turn this GraphQL query into an RPC call on the fly — generating and mounting REST (JSON-over-RPC) endpoints for it at http://localhost:9991/operations/[operation_name].
💡 “Wait, two independent, separate queries?” You might be wondering. “How could this give us the data we need?” You get a cookie for being observant, but…patience, young padawan. We’ll get there.
Then, you’d just hit these endpoints from your frontend to send in query params (if needed) and get back data.
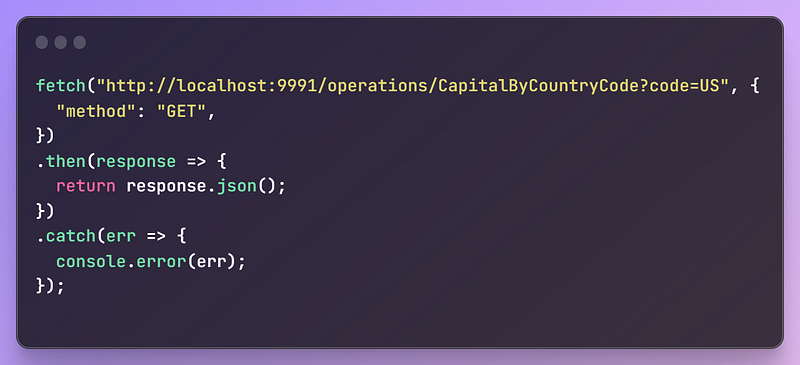
Here’s an example, using our first API.
However, if you’re using NextJS, data fetching (and ensuring typesafety) becomes much easier, because WunderGraph will also generate fully typesafe data fetching hooks for your dev environment. You can directly use those in the frontend instead.
2. Typesafe Hooks
Check out ./.wundergraph/wundergraph.config.ts again, and you’ll find that WunderGraph comes with a code generation framework — and you can pass it templates to tell it what to generate. If you’re using the create-wundergraph-app CLI to create the WunderGraph + NextJS app, you’ll have this all set up already.
COPY
COPY
// configureWunderGraph emits the configuration
configureWunderGraphApplication({
  apis: [countries, graphbrainz],
  //...
  codeGenerators: [
    {
      templates: [...templates.typescript.all],
    },
    {
      templates: [new NextJsTemplate()],
      path: '../components/generated',
    },
  ],
  //...
})
As you might have guessed — yes, you can change path to specify the directory WunderGraph’s generated hooks get saved to.
Here, we’re using templates.typescript.all to create a base client for generating typesafe hooks, and a new instance of NextJsTemplate() to tell it we want to use WunderGraph’s NextJS hooks implementation that uses Vercel’s SWR under the hood (this also gives us handy things like caching, revalidation, deferred queries etc. out of the box)
💡 Instead of SWR, you could also use Tanstack Query (
react-query) with the base typescript client for your hooks if you wanted. To do this, check here.
Now, when you define any GraphQL operation and hit save, you’ll have access to auto generated, fully typesafe hooks for use in the frontend — useQuery, useMutation, useSubscription — and others.
Note that the 3 examples below are NOT the final code we’ll be using for our app, specifically, but they will help you learn how WunderGraph works.
useQuery
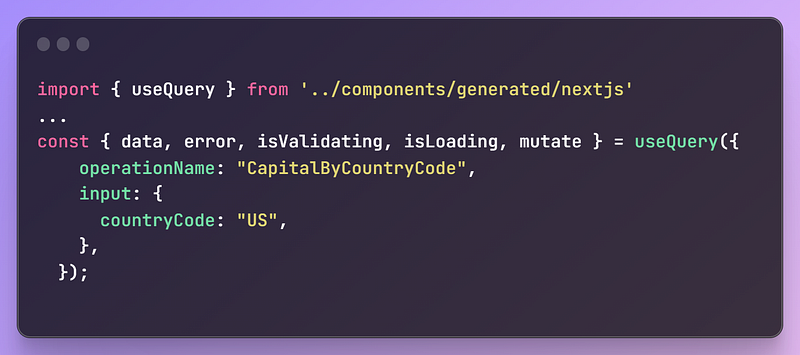
As you can see, you’ll get a lot more than just the data you need, here.
The use cases for error, isValidating, and isLoading are obvious — conditional rendering and user feedback. However, mutate is particularly handy — this is a function that you could call anytime within your frontend code (perhaps inside an onClick handler) to immediately invalidate and refetch the query.
useMutation
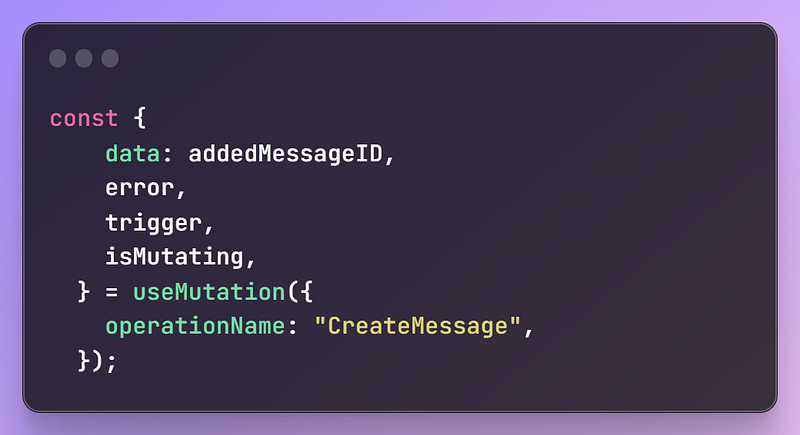
As mentioned before, WunderGraph’s default implementation of the NextJS client uses a wrapper around Vercel’s SWR for the hooks. Specifically, useMutation in WunderGraph uses SWR’s useSWRMutation hook.
This means we get access to deferred or remote mutations — which are not executed until explicitly called with the trigger function, which is what you see being returned above when using useMutation in your frontend.
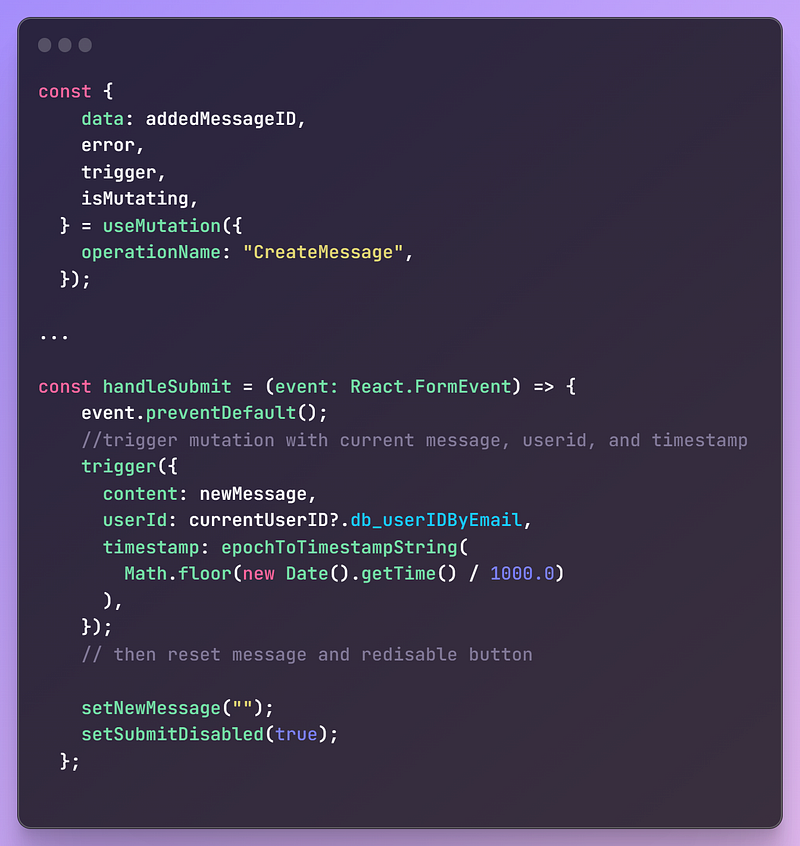
Here’s a non-contrived example. A form onSubmit event is what explicitly triggers this mutation, and I’ve passed in the inputs my GraphQL mutation requires as an argument to the trigger function.
useSubscription
WunderGraph supports GraphQL Subscriptions out of the box — without needing to set up WebSockets.

These are low-latency, true-multiplexed HTTP/2 streams. You define Subscriptions in .graphql files just like queries or mutations, and in NextJS, data — and whichever UI is using it — will update automatically as new updates become available.
Got all that? Good. Now, let’s look at how we’ll actually use useQuery for our tutorial….and answer a certain longstanding question of yours.
3. Cross API Joins
Often, you’ll run into situations where you’ll need to daisy-chain data requests where the output of the first serves as the input for the second, and so on.
In fact, if you’ve been paying attention, you’ve probably realized that we’ll need just such a cross-API JOIN for our tutorial app, too, as neither of our 2 APIs can give us the information we need, alone.
Doing such JOINs in-code, however, is one of the most common pain points for developers, no matter what the data sources are. WunderGraph, on the other hand, makes these cross-source joins a cakewalk (and does them in the virtual graph layer) with the @internal + @export directives, and the _join field.
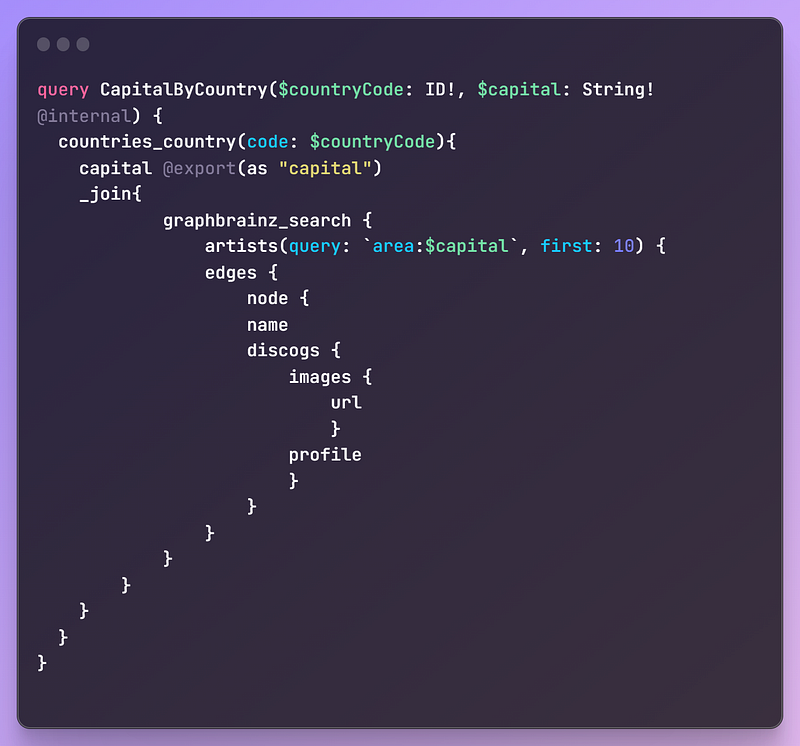
Our app will require something a little more complex than this, but first, let’s take a look at a simple example to explain these cross-source joins.
Say you had two data sources like this.
The first returns the weather for a given city, and the second can return the capital of every country in a given continent. If we wanted to use the output of the second as input for the first, we could just specify a continent, and get the weather for the capital of each country in it, directly.
Here’s what the necessary GraphQL query would look like.
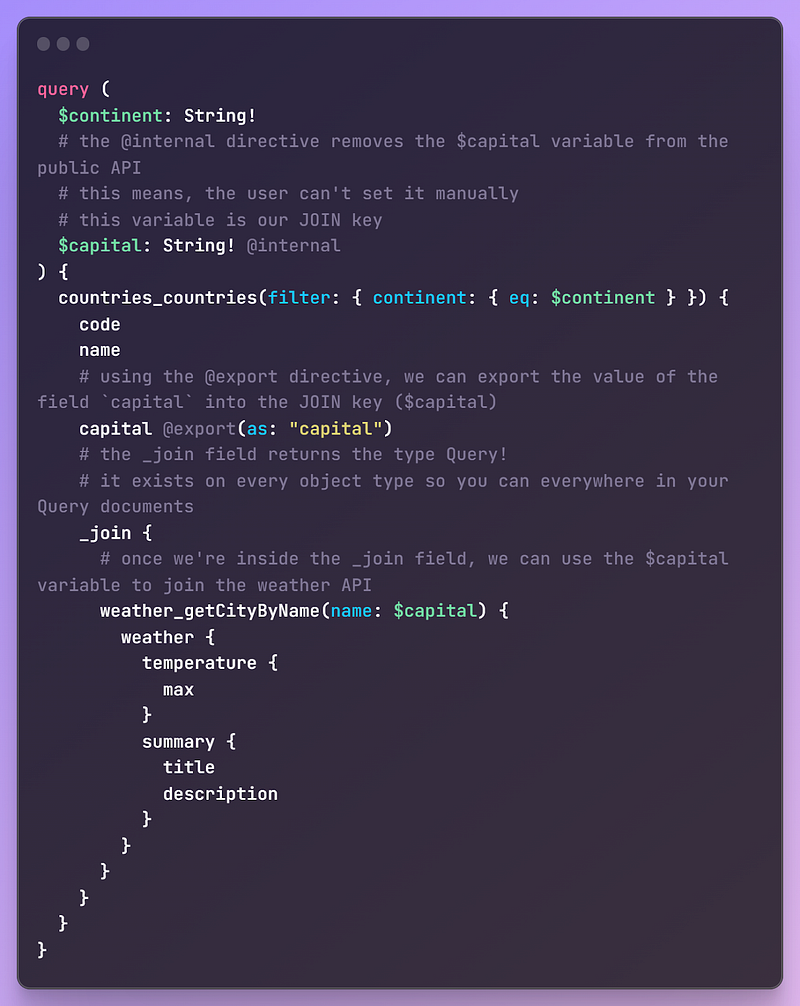
We’re using the @export directive to export the value of the field capital into the JOIN key ($capital). Then we’re using the ready-made _join field (provided automatically by WunderGraph to every object type) to join the weather API.
Back to our App — and a Problem.
Got it? Good. Now…coming back to our example app, we see that for our specific JOIN, the output of the Countries API (that provides us with the capital for a given country) must be chained into the input of the GraphBrainz API (that can give us all bands and solo artists who call that city their home).
Simple, right? But as you write this GraphQL query, you’ll immediately see that we’ve run into a snag here.
This is not valid GraphQL.
The graphbainz_search query needs to prepend any queries with the ‘area:’ string to indicate this is going to be a search by artist location. But GraphQL does NOT support string template literals, or concatenation, like in JavaScript-land.
But…don’t lose hope yet. This is where WunderGraph’s TypeScript Functions can help!
4. TypeScript Operations
Here’s WunderGraph’s killer feature.
If you don’t want to (or can’t) use GraphQL, you can literally just define custom TypeScript functions to query, mutate, and subscribe to data instead.
Just how important is this? Using TypeScript Operations, you could share the exact same types in both the backend and the frontend — and thus get all the benefits of using TypeScript in both — autocompletion, suggestions, refactors, and immediate feedback in your IDE if you’re using or returning the wrong type of data.
How do you use these? First of all, WunderGraph operations use file-based routing, similar to NextJS. So if using TypeScript, you would have get.ts/subscribe.ts/update.ts etc. under a folder that is your operation name, like so:

Secondly, what would the contents of get.ts look like? Simply define an input shape, and write an async function that acts as a resolver. You’re done.
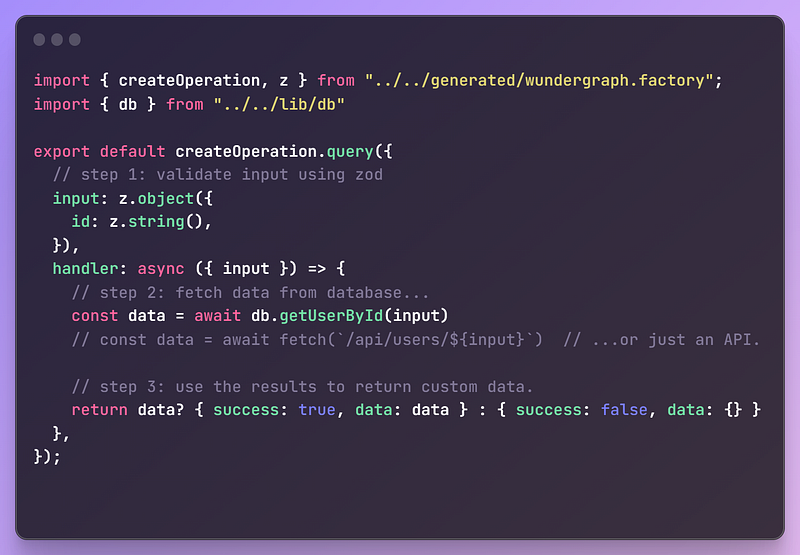
These TypeScript Operations are entirely in server-land — meaning you can natively async/await any Promise within them to fetch, modify, expand, and otherwise return completely custom data, from any data source you want, and then use the exact same typesafe hooks WunderGraph generates for you to call into them from the frontend — just like you did for the GraphQL operations before.
It’s like having all the devex wins of using Server Components in NextJS 13 — without having to migrate your app to the currently very raw, janky NextJS 13.
What’s more — you can still use your traditional GraphQL Operations within them!
Solving our Problem.
Now, how can this solve the issue we ran into, doing the GraphQL join?
Well, using TypeScript Operations, we can do the JOIN in JavaScript-land instead — which DOES have string template literals and concatenations! Plus, a million more options for validation and extensibility at our disposal that we simply can’t have in GraphQL.
Here’s what our code would look like using TS Operations instead.
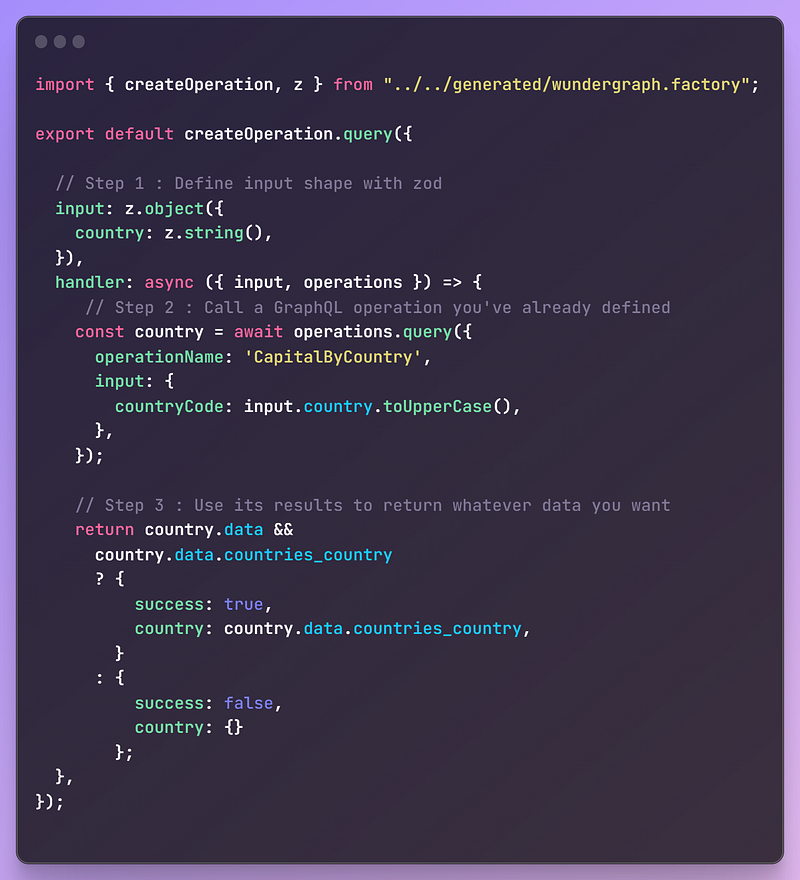
/.wundergraph/operations/artists/get.ts
COPY
COPY
import { createOperation, z } from '../../generated/wundergraph.factory'

export default createOperation.query({
  // Step 1 : Define input shape with zod
  input: z.object({
    country: z.string(),
  }),
  handler: async ({ input, operations }) => {
    // Step 2 : API call #1 to get capital by ISO-3166 code
    const capitalResult = await operations.query({
      operationName: 'CapitalByCountry',
      input: {
        countryCode: input.country.toUpperCase(),
      },
    })

    let areaInput

    if (
      capitalResult.data &&
      capitalResult.data.countries_country &&
      capitalResult.data.countries_country.capital
    ) {
      areaInput = capitalResult.data.countries_country.capital
        .normalize('NFD') // decompose the string into its individual Unicode code points
        .replace(/[\u0300-\u036f]/g, '') // Remove combining diacritical marks
        .replace(/[^\w\s]/gi, '') // Remove punctuation marks (e.g. "Washington, D.C.")
        .replace(/\s+/g, '+') // Replace whitespaces for string encoding.
    }

    const artistsResult = await operations.query({
      operationName: 'ArtistsByArea',
      input: {
        query: `area:${areaInput}`,
      },
    })

    // Step 3B (Optional) : Reject results which dont have details we need.
    const filteredArtists =
      artistsResult.data?.graphbrainz_search?.artists?.edges?.filter(
        (object) => {
          if (object && object.node) {
            return (
              // object
              object.node.discogs && object.node.discogs.profile
              // && object.node.discogs.images
            )
          }
        }
      )

    // Step 4 : Return custom data!
    return capitalResult.data &&
      capitalResult.data.countries_country &&
      filteredArtists
      ? {
          success: true,
          country: capitalResult.data?.countries_country.name,
          capital: areaInput,
          artists: filteredArtists.slice(0, 6), // for our example, just get the first 6
        }
      : { success: false }
  },
})
💡 What’s more, for Runtime Typechecking you could use the built-in Zod to define shapes of API responses and validate them, too.
Then, call into it from the frontend, exactly the same way as you would a GraphQL Operation…
COPY
COPY
const { data, isLoading } = useQuery({
  operationName: 'artists/get',
  input: {
    country: query,
  },
})
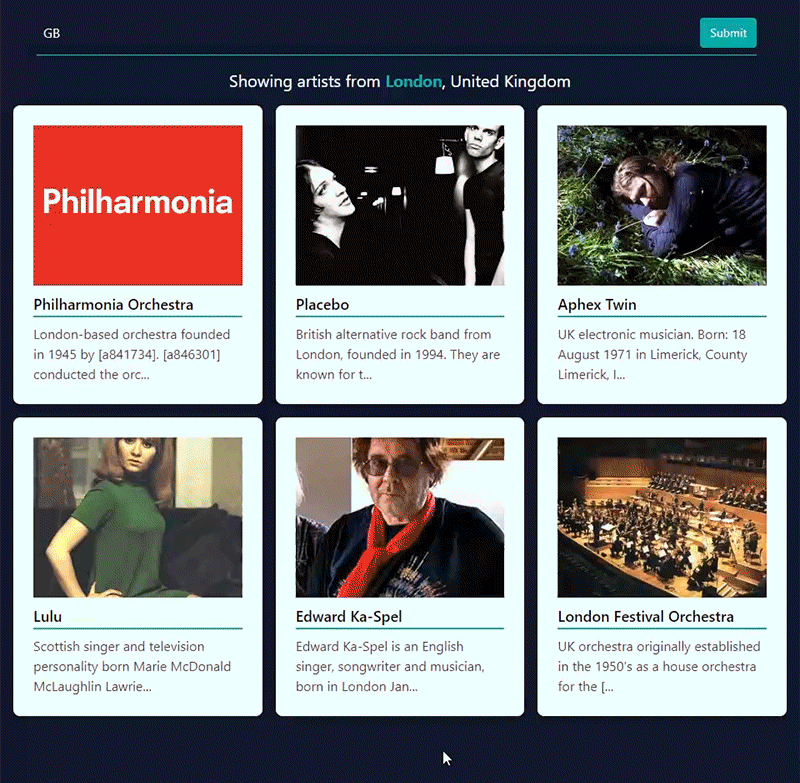
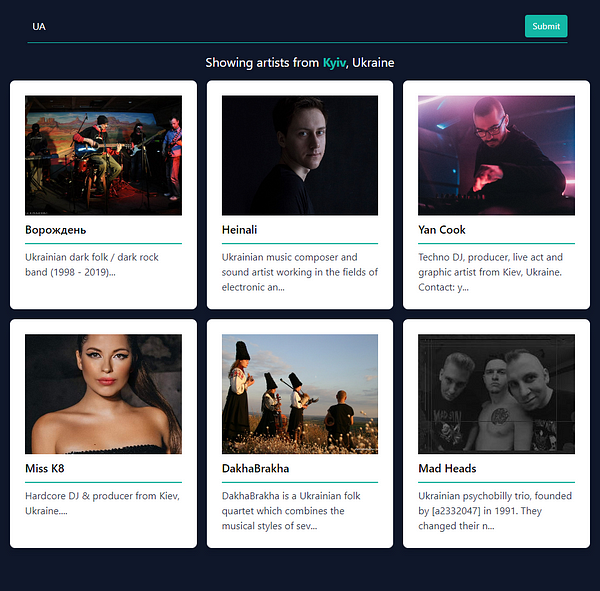
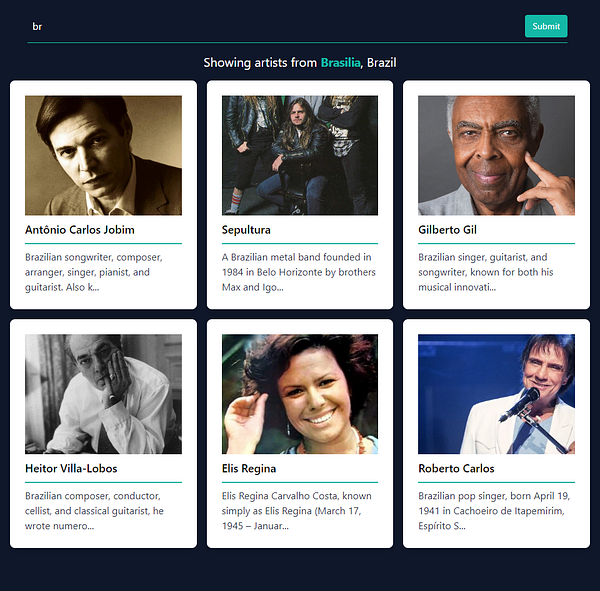
…and use it in your frontend code to show artist data exactly how you want it. I’m using a component that renders a grid of cards here.
/components/ArtistCard.tsx
COPY
COPY
import React from 'react'

type Props = {
  name: string
  imageUrl: string | null
  profile: string
}

const ArtistCard = ({ name, imageUrl, profile }: Props) => {
  return (
    <div key={name} className="rounded-lg bg-white p-6 shadow-lg">
      <img
        src={imageUrl || 'https://via.placeholder.com/192'}
        alt={name}
        title={name}
        className="h-48 w-full object-cover"
      />
      <h2 className="border-b-2 border-teal-500 py-2 text-lg font-medium">
        {name}
      </h2>

      <p className="mt-2 text-gray-700">{profile?.substring(0, 80) + '...'}</p>
    </div>
  )
}

export default ArtistCard
Et voila! Here’s your app in all its glory — daisy-chaining two GraphQL operations, using plain old TypeScript functions to do the JOIN server-side, and then using typesafe hooks on the frontend to fetch and display the data.
Personally, I find doing these Cross API JOINs in TypeScript Functions land SO much more intuitive. These are infinitely more testable since you can’t test JOINs in WunderGraph’s GraphiQL playground at localhost:9991/graphiql, (these Cross-API JOINs are a WunderGraph-specific thing, not technically valid GraphQL). Plus, who wouldn’t love built-in Zod?
Where to go from here? Let’s see how you can use NextAuth to authenticate WG’s GraphQL/TypeScript operations!
4. Adding Auth to WunderGraph Operations with NextAuth.js
Auth is inevitably a pain no matter the framework, but NextAuth.js makes the developer experience of implementing authentication + authorization much better.
Could we use it with WunderGraph, though?
You can throw NextAuth on the NextJS app (frontend) and it’ll work. However, all this does is add an auth layer on your UI, and only that. Users who are not signed in won’t be able to see or interact with the UI, yes, but the queries will still happen on the WunderGraph/API Gateway layer regardless. This is probably not what you have in mind when you think ‘auth’.
The Strategy
The solution then, is to use NextAuth.js in front of WunderGraph’s API Server, and explicitly require authentication to do any querying, mutating, or updating at all.
Good news! You can do just that by using NextAuth.js with a JWT based strategy, and writing NextJS middleware to inject that token into each WunderGraph operation (whether you’re using GraphQL or TypeScript for them) via hooks.
You could also use this method to add auth using any other non-OpenIDConnect compatible auth methods like Netlify’s Gotrue, Supabase Auth, etc. that use JWT.
Here’s how you do it.
Step 1 : The Basic NextAuth Implementation
Covering NextAuth itself is beyond the scope of this tutorial — so let’s get through this quickly by saying you should follow this Getting Started guide.
TL;DR: Come back to this tutorial once you:
have your ENV files set up,
[…nextauth].tsin place as an API route,_app.tsxwrapped in the<SessionProvider>context,and your
useSession/signIn/signOuthooks and functions in place in your frontend.
Step 2 : Add token based auth to WunderGraph’s config
In wundergraph.config.ts, add token based authentication to WunderGraph’s config-as-code. The userInfoEndpoint property should point to the NextAuth.js URL that fetches current user session as JSON. Make sure this is set up correctly, as WunderGraph will call this endpoint with the Authorization header containing the JWT token that we will setup later.
COPY
COPY
// configureWunderGraph emits the configuration
configureWunderGraphApplication({
  apis: [countries, graphbrainz],
  //...
  authentication: {
    tokenBased: {
      providers: [
        {
          userInfoEndpoint: `${process.env.NEXT_URL}/api/auth/session`,
        },
      ],
    },
  },
For getting the session JSON, this is the default path if you have installed NextAuth in /pages/api/auth/[…nextauth].ts, if you use another path, you’ll need to adjust the userInfoEndpoint accordingly.
Step 3 : Explicitly require auth for all WunderGraph operations
Self-explanatory; change the default false to true in wundergraph.operations.ts.
COPY
COPY
export default configureWunderGraphOperations<OperationsConfiguration>({
  operations: {
    defaultConfig: {
      authentication: {
        required: true,
      },
    },
    //...
  },
})
Step 4 : Create your own hooks that point to an explicit baseURL
Using NextJS middleware, we can add the NextAuth session token to the Authorization header and forward it to WunderGraph — but if we still want to use our Next/React hooks, we’ll have to create our own instead of using the default ones WunderGraph generates.
So let’s handle that first.
Just create a wundergraph.ts file, with a new lib folder in your project root to put it in, and wrap the hooks you’ll be using to use a baseURL.
COPY
COPY
import { createWunderGraphNext } from '../components/generated/nextjs'

const {
  client,
  withWunderGraph,
  useQuery,
  useMutation,
  useSubscription,
  useFileUpload,
} = createWunderGraphNext({
  baseURL: `${process.env.NEXT_URL}/api/wg`,
  ssr: true,
})

export {
  client,
  withWunderGraph,
  useQuery,
  useMutation,
  useSubscription,
  useFileUpload,
}
Step 5 : Middleware.ts
Next, create a middleware.ts file in your project root, and put this code in it.
COPY
COPY
import { NextResponse } from 'next/server'
import type { NextRequest } from 'next/server'

// the middleware will run for all requests that match this pattern,
// we don't actually need to define an api route for this.
export const config = {
  matcher: '/api/wg/:function*',
}

export function middleware(request: NextRequest) {
  // retrieve the session token from the cookie
  const token = request.cookies.get('next-auth.session-token')?.value

  let pathname = request.nextUrl.pathname.replace('/api/wg', '')

  // rewrite the api url to the WunderGraph API
  const url = new URL(
    pathname + request.nextUrl.search,
    process.env.WUNDERGRAPH_URL
  )

  // add the token to the Authorization header
  const headers = new Headers({
    Authorization: `Bearer ${token}`,
  })

  // rewrite the request to the WunderGraph API
  const response = NextResponse.rewrite(url, {
    request: {
      headers,
    },
  })

  return response
}
What’s happening here?
This middleware runs (before any page rendering takes place), for all routes that request an operation — i.e. anything that matches the baseURL of the hooks we created in the previous step (This is your frontend NextJS app — http://localhost:3000/api/wg/* in dev)
The Middleware rewrites the URL to instead point to your WunderGraph server (http://127.0.0.1:9991/api/* in dev)
Then, it injects our NextAuth session token into that request, as an Authorization header in the format “
Bearer <session token>”,Finally, it moves on to the actual page rendering (using
NextResponse).
This will make every query need this token — meaning a client will get back results of a given operation if, and only if, the request is authenticated and a valid session token exists. Your NextAuth integration now gates data fetching across your entire app, not just for conditional rendering on the frontend.
Step 6 : Home Stretch
You’re pretty much done, but for one step. On the frontend, modify whichever hooks you use (useQuery, for us) to only be enabled if the user is authenticated i.e. a non-null session exists.
COPY
COPY
// import { useQuery, withWunderGraph } from "../components/generated/nextjs";
import { useQuery, withWunderGraph } from "../lib/wundergraph";
//...
const Home: NextPage = () => {
 const { data: session } = useSession();
 //...
 const { data, isLoading } = useQuery({
   operationName: "artists/get",
   input: {
     country: query,
   },
   enabled: !!session, // only run this query if user is logged in
 });
Don’t forget to import and use the hooks (that work with middleware) that you created in Step 4, not the default ones WunderGraph generated!
5. How would I even deploy this?
Our app has two parts to it:
WunderGraph’s primary server (WunderNode) which is an application server in Go + NodeJS that mounts the API endpoints and serves your app, and
The NextJS frontend.
The WunderNode needs to be deployed to a platform that supports Dockerized images, like Fly.io, or WunderGraph Cloud, while the NextJS frontend can be deployed to Vercel or Netlify as usual.
On first glance, it seems you’ll need a monorepo for this — a separate NextJS app for the frontend that only does data fetching calls to the WunderGraph server, and a WunderGraph + NextJS app that you only use in dev. This is tedious, but it’ll work; WunderGraph Cloud supports monorepos out-of-the-box.
However, if you’re using WunderGraph Cloud, you don’t need anything more than the WG + NextJS app you already have, making deployment orders-of-magnitude simpler. Let’s have a look!
Prerequisites
Don’t forget to add your production frontend URL to WunderGraph’s CORS config!
./.wundergraph/wundergraph.config.ts
COPY
COPY
// configureWunderGraph emits the configuration
configureWunderGraphApplication({
  apis: [countries, graphbrainz],
  // ...
  cors: {
    ...cors.allowAll,
    allowedOrigins: [process.env.NEXT_URL],
  },
  // ...
  authentication: {
    tokenBased: {
      providers: [
        {
          userInfoEndpoint: `${process.env.NEXT_URL}/api/auth/session`,
        },
      ],
    },
  },
  // ...
})
For a more fine-grained CORS config, check here.
Deploying the WunderNode
TL;DR:
Go to WG cloud, sign in with your GitHub
Give it access to the specific repo you want to deploy — or use one of their templates
Wait for the WG GitHub app’s CI to build and deploy the main branch of the repo you’re adding.
It’s ready! Go to the Operations tab and copy the link to the operation you need — essentially, this has the same pattern as your localhost URLs — https://[your-wg-cloud-deployment-url]/operations/[operation-name]?[params]. For us, this is ArtistsGet which we defined in the ./wundergraph/operations/artists/get.ts file
cURL or Postman this URL with params ?country=AU or similar to test if everything works.
If you prefer video format, you can also watch this 90 second video on how to deploy to WunderGraph Cloud
How to deploy your project to WunderGraph Cloud
You’re done!
Deploying the NextJS Frontend
Let’s use Vercel for this. You can do these steps concurrently with the WunderNode deployment.
TL;DR:
Create an account on Vercel if you don’t already have one, and log in.
Go to your Vercel dashboard, click on “Add New” → Project, then import the same NextJSWunderGraph repo you used for the WunderGraph Cloud deployment, and hit Import.
Then, go to Settings, expand Environment Variables, and copy over the NEXTAUTH_SECRET, GITHUB_ID, and GITHUB_SECRET values from your project.
You can’t copy over NEXTAUTH_URL as is (it’s still http://localhost:3000), so add it anew, and point it at the canonical URL of your Vercel deployment.
Over in your GitHub Developer Settings, do the same for the OAuth Callback URL for the OAuth app you’re using for this project. Anything with a ‘http://localhost:3000” part has to be replaced.
Hit Deploy. Vercel will now build and deploy your frontend. This might take some time.
Go to the Deployments tab, and you’ll be able to see your deployed project, and copy out the URL.
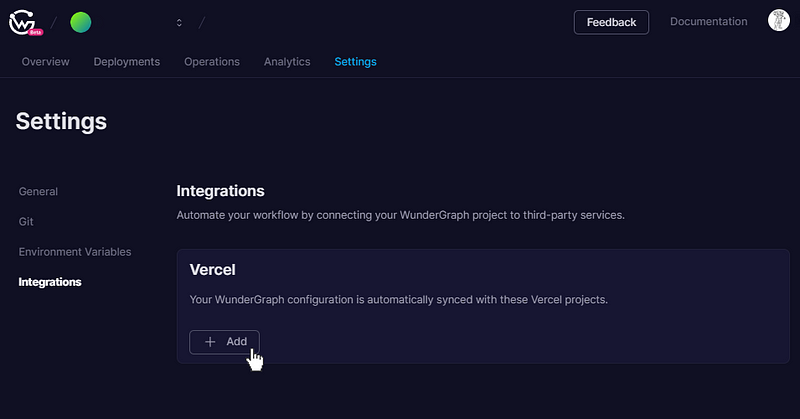
Setting up WunderGraph’s Vercel Integration
Now if you visit your Vercel deployment, you’ll find you can sign in — so auth works — but there’s no data. What gives? Well, this is because your NextJS app on Vercel, and your WunderNode on WunderGraph Cloud don’t talk to each other yet.
Don’t fret, making this happen is a cakewalk!
Head on over to your WunderGraph Dashboard, and under Settings → Integrations, you’ll find that it offers one for Vercel, and you can sync up your WunderNode and NextJS deployments this way, making sure you need no further fiddling to get them to play nice.
You’ll be prompted on your Vercel dashboard to install this integration, and choose which project you wish to link it to. Make sure you have your deployments sorted, and hit Connect.
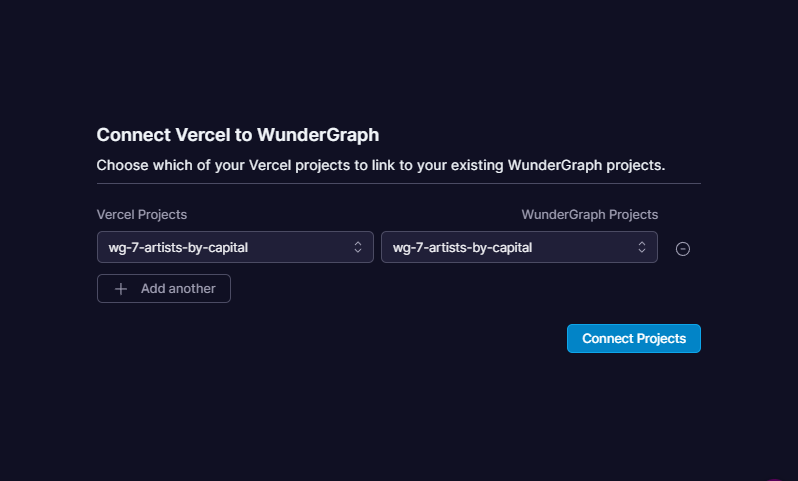
You’re done! Now, you can go to your Vercel deployment, sign in with your GitHub (that’s your NextAuth efforts paying off), make searches, and see data flowing in. Awesome!
If you prefer video format again, you can watch how to sync WunderGraph Cloud and Vercel in this video.
Syncing your WunderGraph application with Vercel
In Summary…
Hopefully, now you have a better understanding of how WunderGraph makes it easy to work with different kinds of data sources, with its powerful introspection and the use of GraphQL or Typescript Operations as a single source of truth for all data. Sharing types between both your server and your client is incredibly powerful — you can have IDE autocomplete and inference while developing the client!
If you need to build modular, data-rich apps for the modern web without compromising on developer experience or end-to-end typesafety, maybe give WunderGraph a try. You can check out their Discord community here.


